Golang单元测试
单元测试概述
什么是单元&单元测试
- 单元是应用的最小可测试部件,如函数和对象的方法
- 单元测试是软件开发中对最小单位进行正确性检验的测试工作
为什么进行单元测试
- 保证变更/重构的正确性,特别是在一些频繁变动和多人合作开发的项目中
- 简化调试过程: 可以轻松的让我们知道哪一部分代码出了问题
- 单测最好的文档:在单测中直接给出具体接口的使用方法,是最好的实例代码
单元测试用例编写的原则
- 单一原则:一个测试用例只负责一个场景
- 原子性:结果只有两种情况:
Pass、Fail - 优先要核心组件和逻辑的测试用例
- 高频使用库,
util,重点覆盖
单测用例规定
- 文件名必须要
xx_test.go命名 - 测试方法必须是
TestXXX开头 - 方法中的参数必须是
t *testing.T - 测试文件和被测试文件必须在一个包中
golang 常用的单测框架
testing
https://golang.google.cn/pkg/testing/
单元测试
Go提供了test工具用于代码的单元测试,test工具会查找包下以_test.go结尾的文件,调用测试文件中以 Test或Benchmark开头的函数并给出运行结果
测试函数需要导入testing包,并定义以Test开头的函数,参数为testing.T指针类型,在测试函数中调用函数进行返回值测试,当测试失败可通过testing.T结构体的Error函数抛出错误
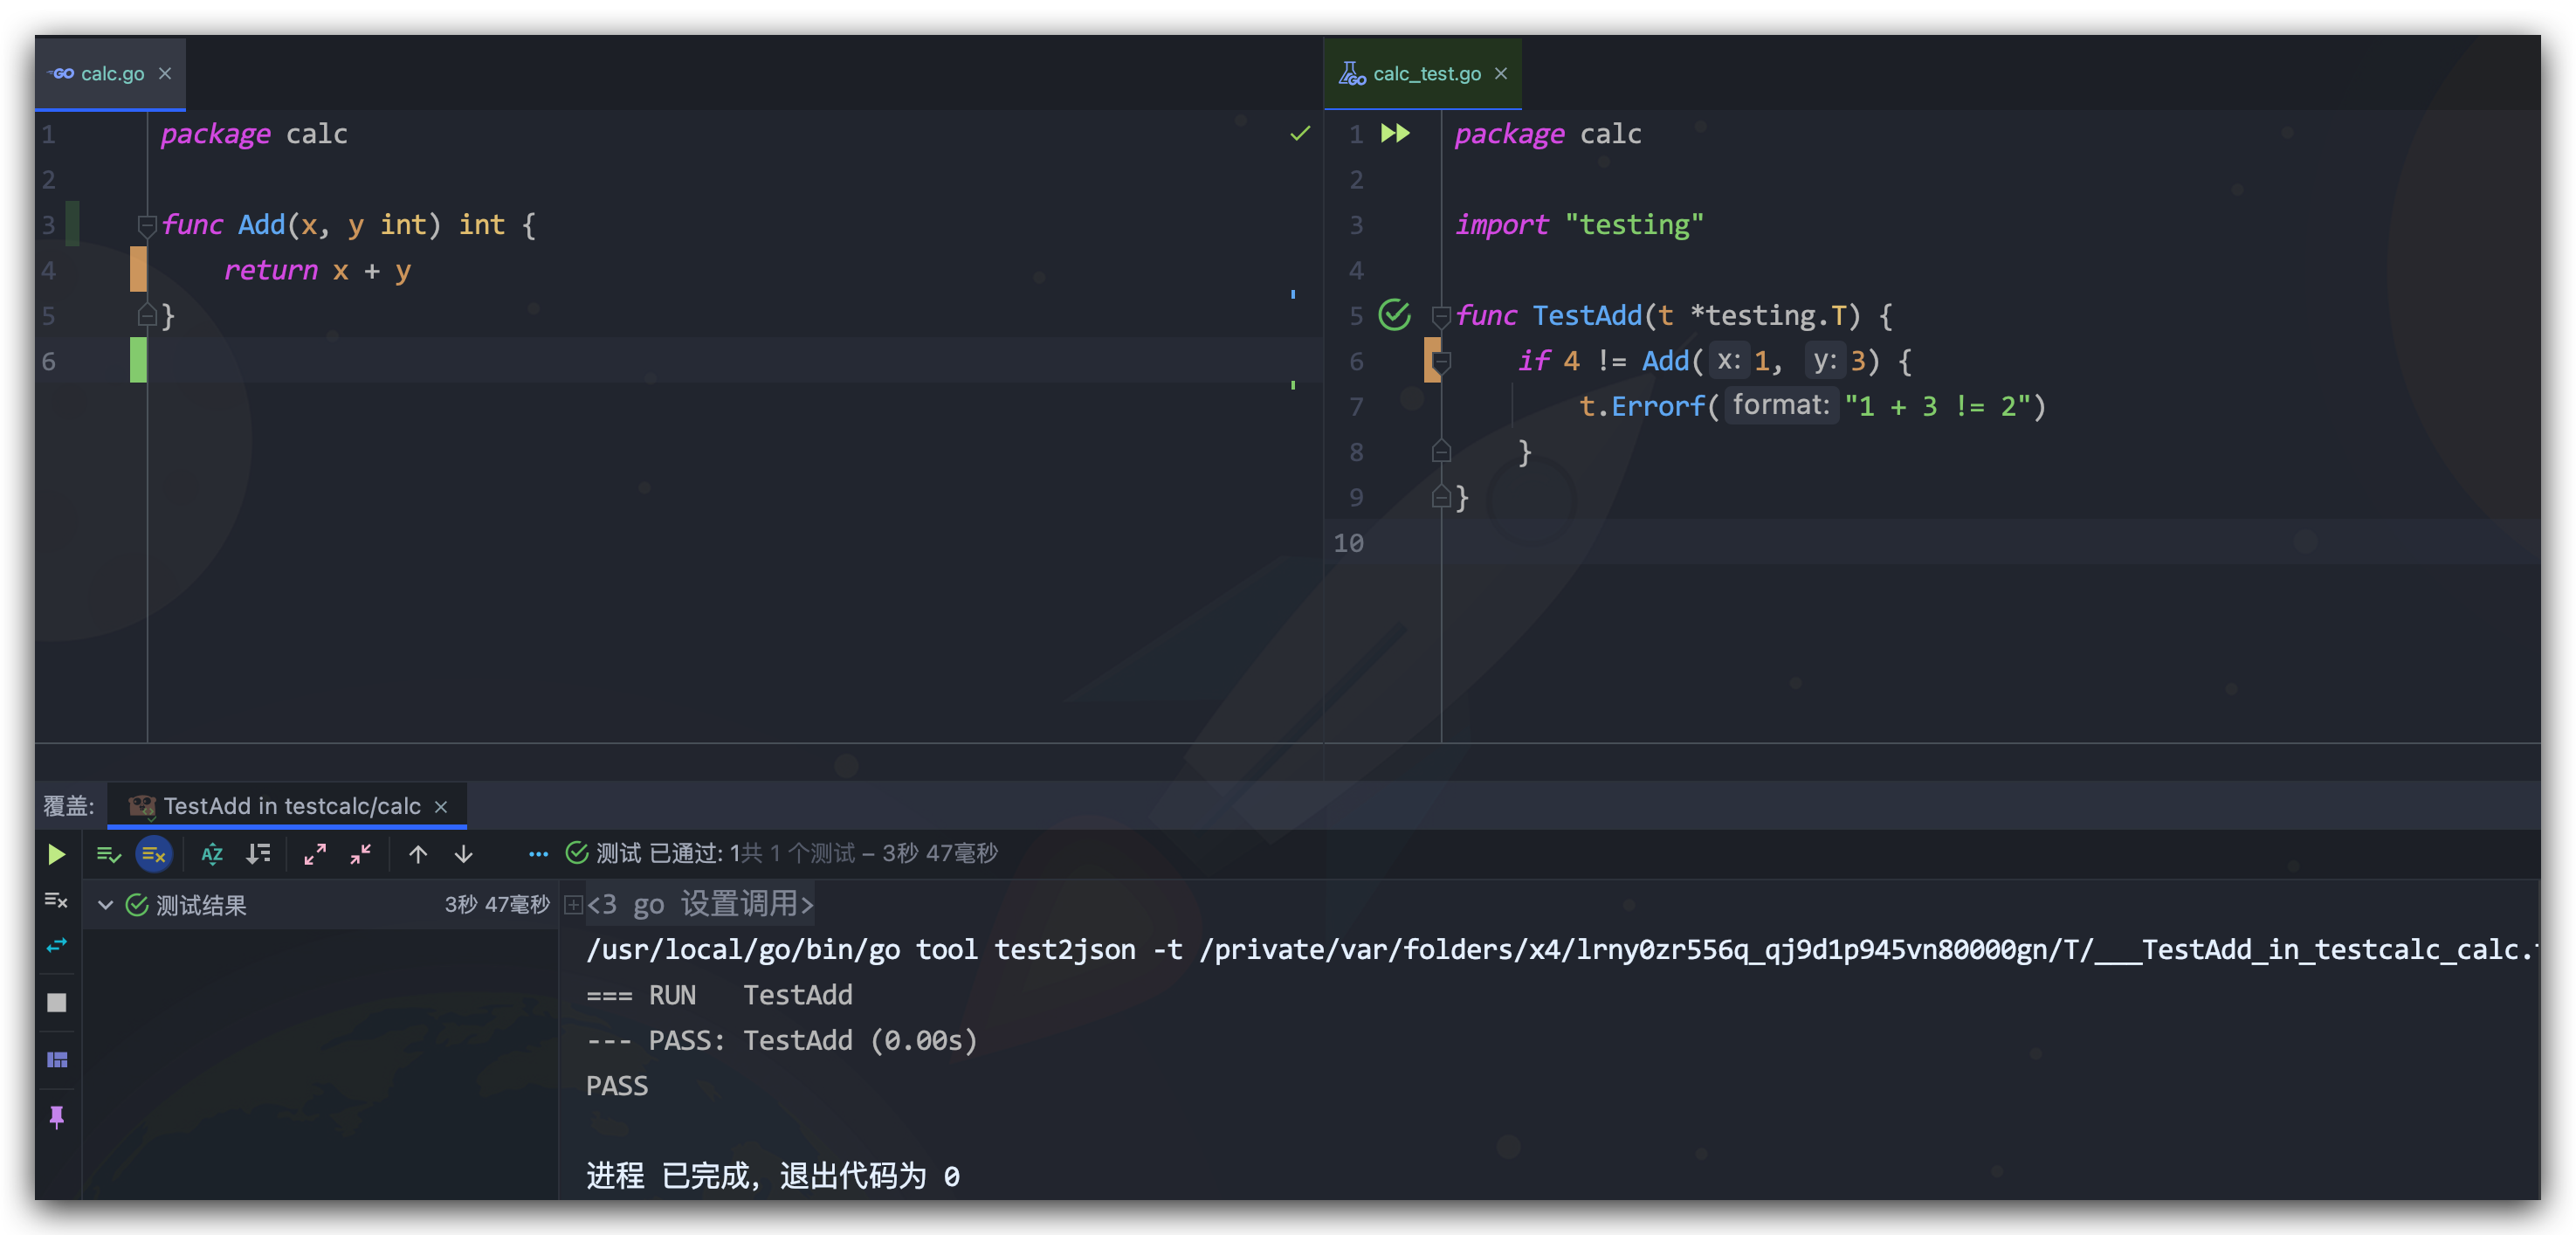
单元测试是对某个功能的测试 命令行执行
go test 包名  # 测试整个包
go test -v .
go test 包名/文件名  # 测试某个文件
简单使用
准备待测代码compute.go
package pkg03

func Add(a, b int) int {
	return a + b
}

func Mul(a, b int) int {
	return a * b
}

func Div(a, b int) int {
	return a / b
}
准备测试用例compute_test.go
package pkg03

import "testing"

func TestAdd(t *testing.T) {
	a := 10
	b := 20
	want := 30
	actual := Add(a, b)
	if want != actual {
		t.Errorf("Add函数参数:%d %d, 期望: %d, 实际: %d", a, b, want, actual)
	}
}

func TestMul(t *testing.T) {
	a := 10
	b := 20
	want := 300
	actual := Mul(a, b)
	if want != actual {
		t.Errorf("Mul函数参数:%d %d, 期望: %d, 实际: %d", a, b, want, actual)
	}
}

func TestDiv(t *testing.T) {
	a := 10
	b := 20
	want := 2
	actual := Div(a, b)
	if want != actual {
		t.Errorf("Div函数参数:%d %d, 期望: %d, 实际: %d", a, b, want, actual)
	}
}
执行测试
➜  pwd
golang-learning/chapter06/pkg03
➜  go test -v .
=== RUN   TestAdd
--- PASS: TestAdd (0.00s)
=== RUN   TestMul
    compute_test.go:21: Mul函数参数:10 20, 期望: 300, 实际: 200
--- FAIL: TestMul (0.00s)
=== RUN   TestDiv
    compute_test.go:31: Div函数参数:10 20, 期望: 2, 实际: 0
--- FAIL: TestDiv (0.00s)
FAIL
FAIL    pkg03   0.198s
FAIL
只执行某个函数
go test -run=TestAdd -v .
=== RUN   TestAdd
--- PASS: TestAdd (0.00s)
PASS
ok      pkg03   0.706s
正则过滤函数名
go test -run=TestM.* -v .
测试覆盖率
用于统计目标包有百分之多少的代码参与了单测
使用go test工具进行单元测试并将测试覆盖率覆盖分析结果输出到cover.out文件
例如上面的例子
go test -v -cover
=== RUN   TestAdd
--- PASS: TestAdd (0.00s)
=== RUN   TestMul
    compute_test.go:21: Mul函数参数:10 20, 期望: 300, 实际: 200
--- FAIL: TestMul (0.00s)
=== RUN   TestDiv
    compute_test.go:31: Div函数参数:10 20, 期望: 2, 实际: 0
--- FAIL: TestDiv (0.00s)
FAIL
coverage: 100.0% of statements
exit status 1
FAIL    pkg03   0.185s
生成测试覆盖率文件
go test -v -coverprofile=cover.out
=== RUN   TestAdd
--- PASS: TestAdd (0.00s)
=== RUN   TestAddFlag
--- PASS: TestAddFlag (0.00s)
PASS
coverage: 75.0% of statements
ok      testcalc/calc   0.960s
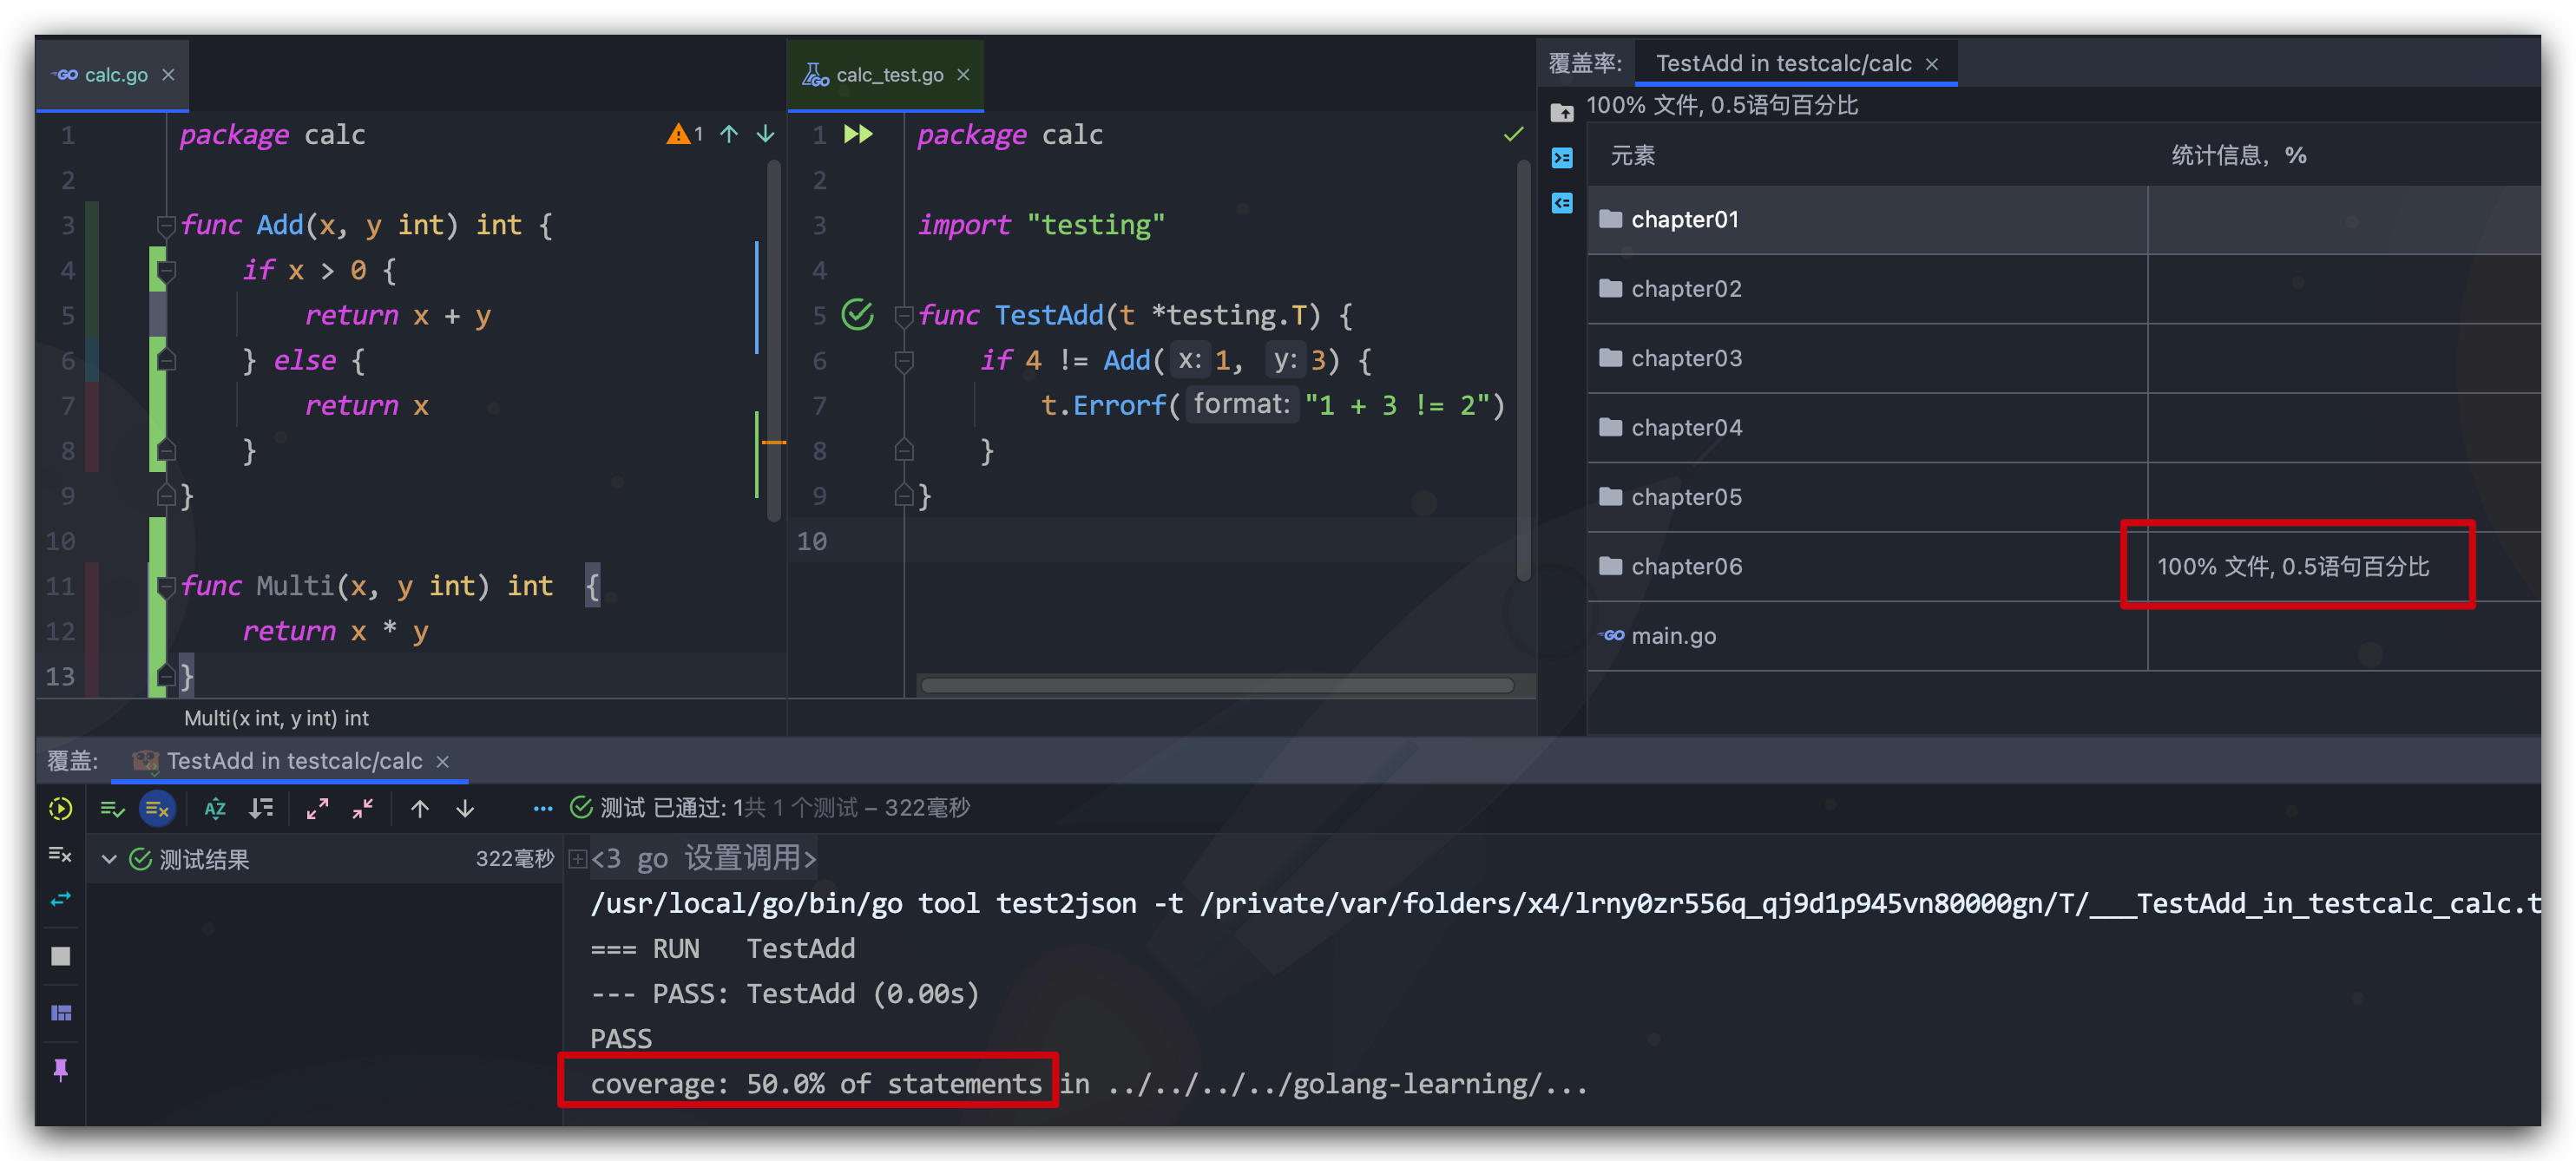
分析测试结果,打开测试覆盖率结果文件,查看测试覆盖率
go tool cover -html cover.out
子测试t.run
func TestMul2(t *testing.T) {
	t.Run("正数", func(t *testing.T) {
		if Mul(4, 5) != 20 {
			t.Fatal("muli.zhengshu.error")
		}
	})
	t.Run("负数", func(t *testing.T) {
		if Mul(2, -3) != -6 {
			t.Fatal("muli.fushu.error")
		}
	})
}
执行测试
➜  go test -v .
=== RUN   TestMul2
=== RUN   TestMul2/正数
=== RUN   TestMul2/负数
--- PASS: TestMul2 (0.00s)
    --- PASS: TestMul2/正数 (0.00s)
    --- PASS: TestMul2/负数 (0.00s)
指定func/sub运行子测试
➜  go test -run=TestMul2/正数 -v
=== RUN   TestMul2
=== RUN   TestMul2/正数
--- PASS: TestMul2 (0.00s)
    --- PASS: TestMul2/正数 (0.00s)
PASS
ok      pkg03   0.675s
子测试的作用:table-driven tests
-
所有用例的数据组织在切片
cases中,看起来就像一张表,借助循环创建子测试。这样写的好处有- 新增用例非常简单,只需给
cases新增一条测试数据即可 - 测试代码可读性好,直观地能够看到每个子测试的参数和期待的返回值
- 用例失败时,报错信息的格式比较统一,测试报告易于阅读
- 如果数据量较大,或是一些二进制数据,推荐使用相对路径从文件中读取
- 新增用例非常简单,只需给
-
举例:prometheus源码:https://github.com/prometheus/prometheus/blob/main/web/api/v1/api_test.go
goconvey
goconvey是一个第三方测试框架,其最大好处就是对常规的if else进行了高度封装
基本使用
准备待测代码student.go
package pkg04

import "fmt"

type Student struct {
	Name      string
	ChiScore  int
	EngScore  int
	MathScore int
}

func NewStudent(name string) (*Student, error) {
	if name == "" {
		return nil, fmt.Errorf("name为空")
	}
	return &Student{
		Name: name,
	}, nil
}

func (s *Student) GetAvgScore() (int, error) {
	score := s.ChiScore + s.EngScore + s.MathScore
	if score == 0 {
		return 0, fmt.Errorf("全都是0分")
	}
	return score / 3, nil
}
参考官方示例,准备测试用例student_test.go
直观来讲,使用goconvey的好处是不用再写多个if判断
package pkg04

import (
	. "github.com/smartystreets/goconvey/convey"
	"testing"
)

func TestNewStudent(t *testing.T) {
	Convey("start test new", t, func() {
		stu, err := NewStudent("")
		Convey("空的name初始化错误", func() {
			So(err, ShouldBeError)
		})
		Convey("stu对象为nil", func() {
			So(stu, ShouldBeNil)
		})
	})
}

func TestScore(t *testing.T) {
	stu, _ := NewStudent("hh")
	Convey("不设置分数可能出错", t, func() {
		sc, err := stu.GetAvgScore()
		Convey("获取分数出错了", func() {
			So(err, ShouldBeError)
		})
		Convey("分数为0", func() {
			So(sc, ShouldEqual, 0)
		})
	})
	Convey("正常情况", t, func() {
		stu.ChiScore = 60
		stu.EngScore = 70
		stu.MathScore = 80
		score, err := stu.GetAvgScore()
		Convey("获取分数出错了", func() {
			So(err, ShouldBeNil)
		})
		Convey("平均分大于60", func() {
			So(score, ShouldBeGreaterThan, 60)
		})
	})
}
执行go test -v .
➜  go test -v .
=== RUN   TestNewStudent

  start test new
    空的name初始化错误 ✔
    stu对象为nil ✔


2 total assertions

--- PASS: TestNewStudent (0.00s)
=== RUN   TestScore

  不设置分数可能出错
    获取分数出错了 ✔
    分数为0 ✔


4 total assertions


  正常情况
    获取分数出错了 ✔
    平均分大于60 ✔


6 total assertions

--- PASS: TestScore (0.00s)
PASS
ok      pkg04   0.126s
图形化使用
- 确保本地有
goconvey的二进制
go get github.com/smartystreets/goconvey
# 会将对应的二进制文件放到 $GOPATH/bin 下面
- 编辑环境变量把
GOPATH/bin加入PATH里面 或者写全路径 - 到测试的目录下,执行
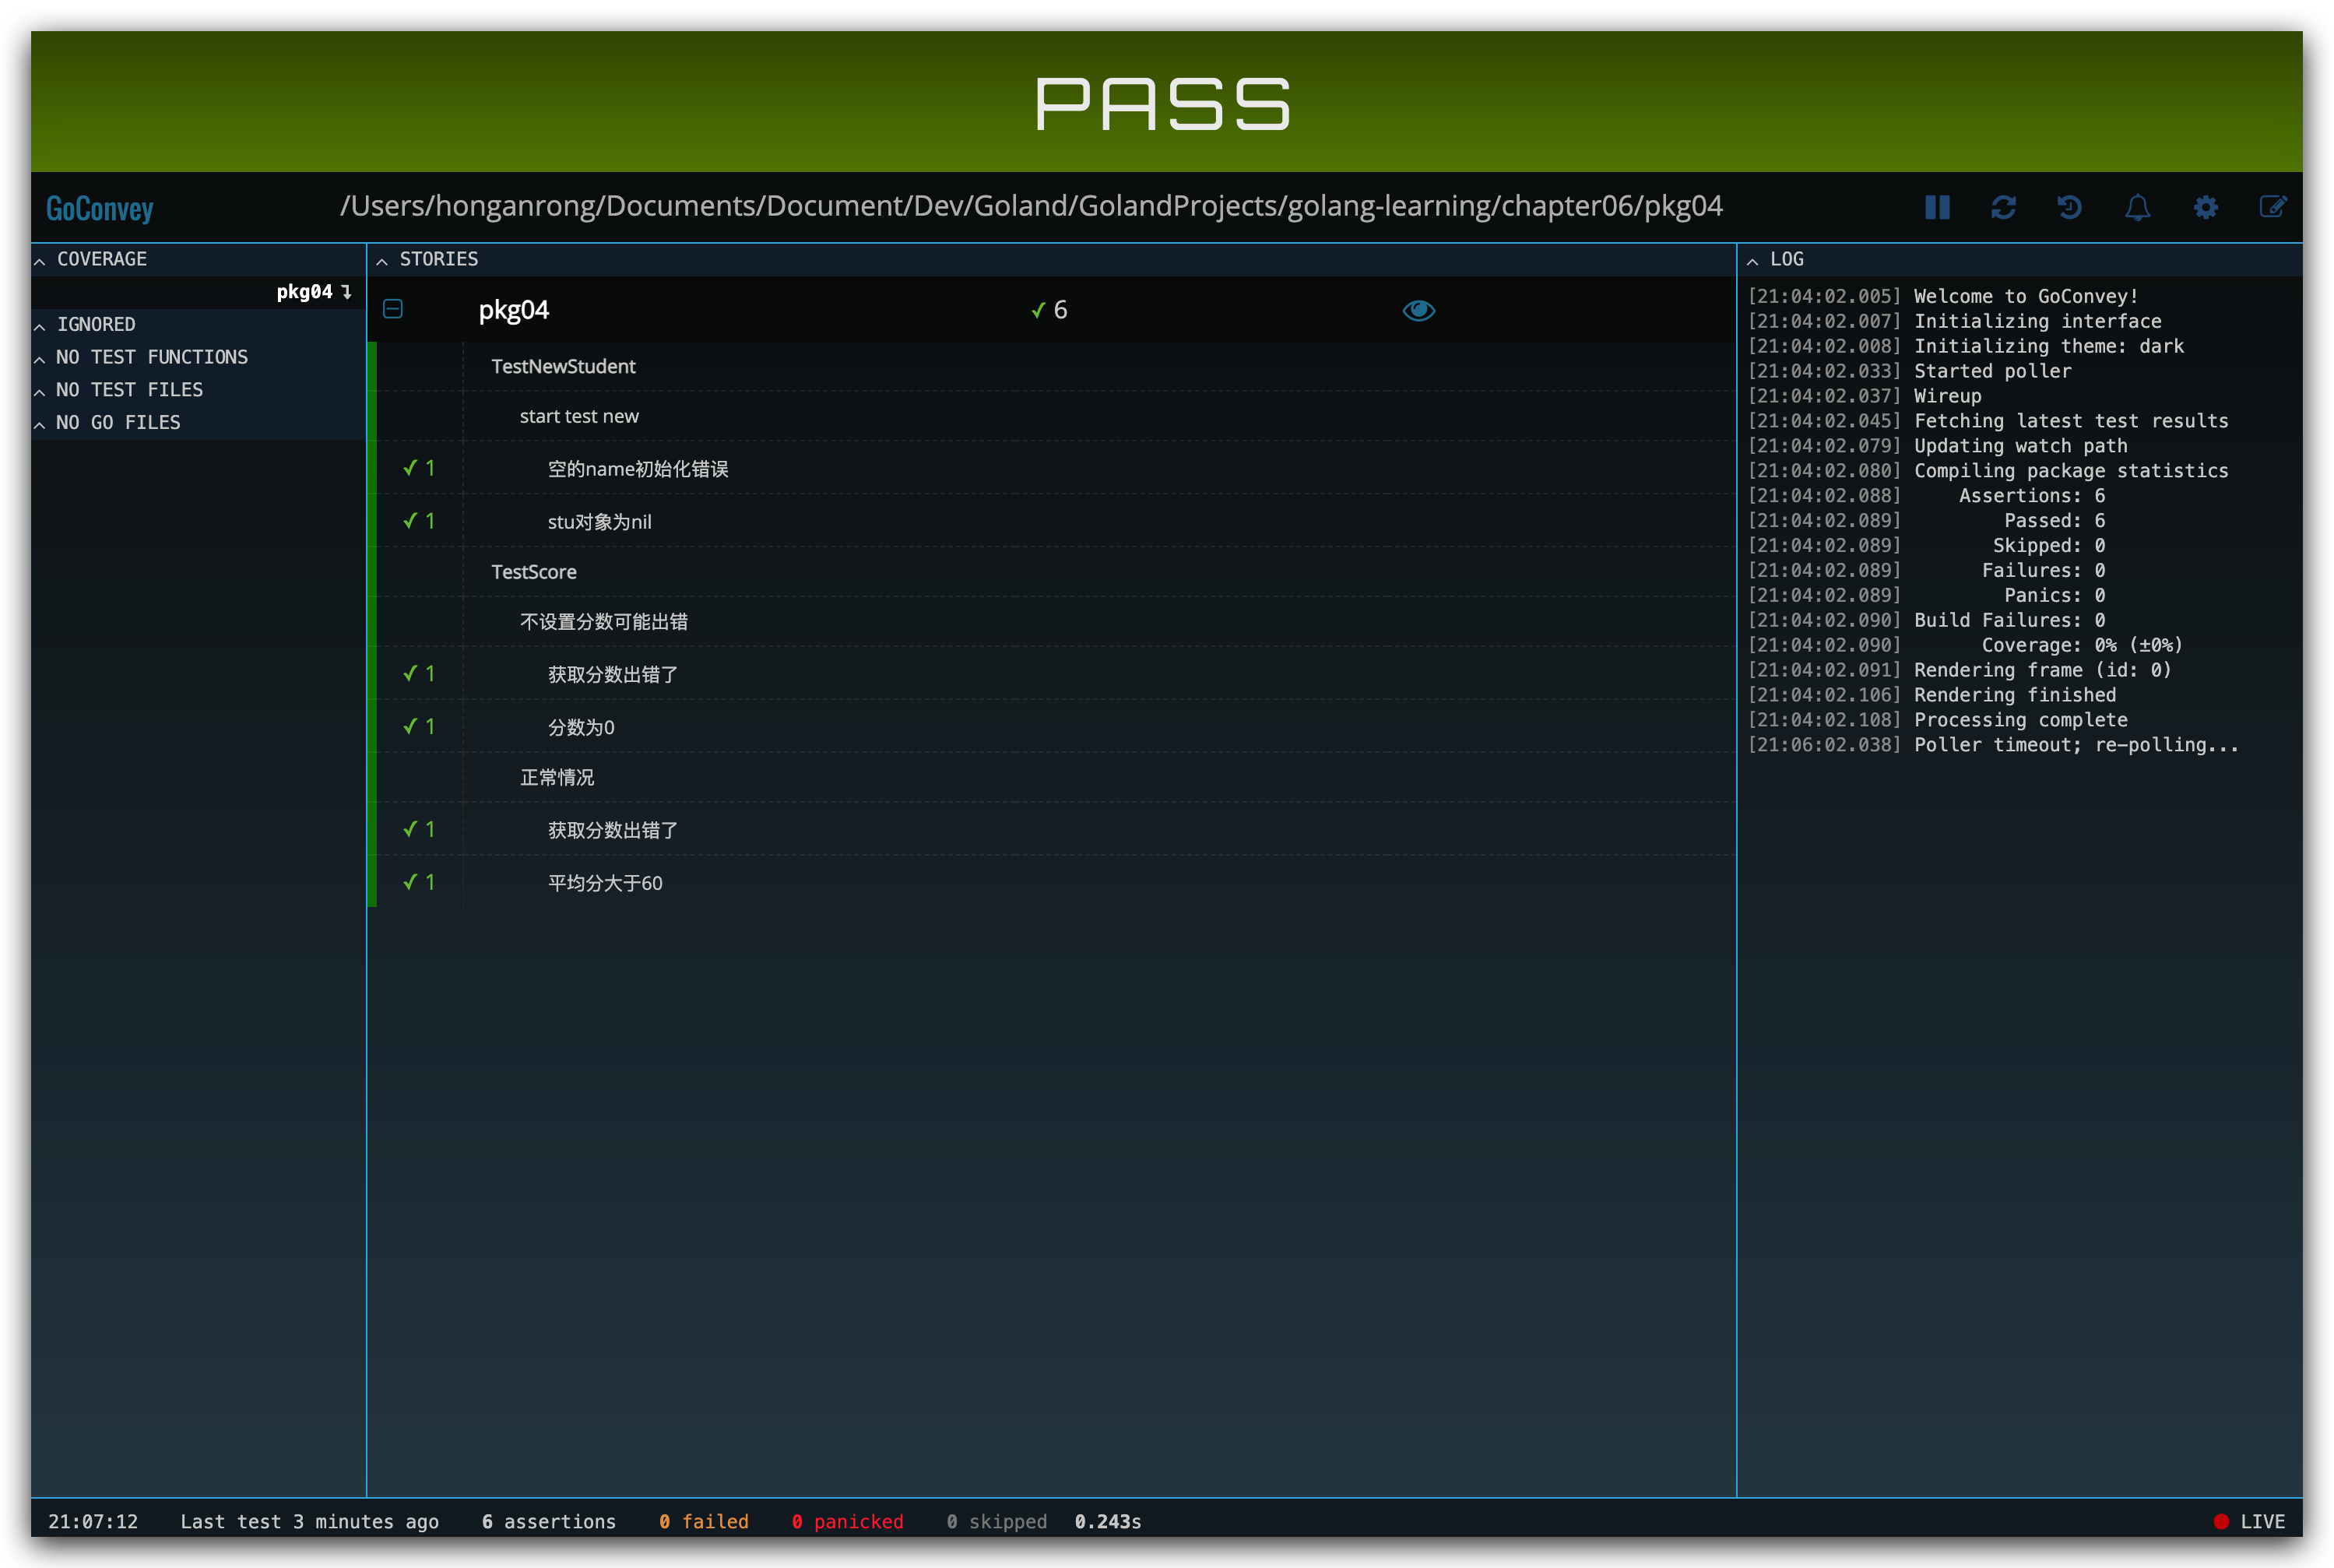
goconvey,启动http 8000,自动运行测试用例 - 浏览器访问 http://127.0.0.1:8000
最终效果如下
testify
简单使用
业务代码cal.go
package pkg05

func Add(x int ) (result int) {
	result = x + 2
	return result
}
测试用例cal_test.go
package pkg05

import (
	"github.com/stretchr/testify/assert"
	"testing"
)

func TestAdd(t *testing.T) {
	// assert equality
	assert.Equal(t, Add(5), 7, "they should be equal")
}
执行测试
➜  go test -v .
=== RUN   TestAdd
--- PASS: TestAdd (0.00s)
PASS
ok      pkg05   1.216s
表驱动测试
package pkg05

import (
	"github.com/stretchr/testify/assert"
	"testing"
)

func TestAdd(t *testing.T) {
	// assert equality
	assert.Equal(t, Add(5), 7, "they should be equal")
}

func TestCal(t *testing.T) {
	ass := assert.New(t)
	var tests = []struct {
		input    int
		expected int
	}{
		{2, 4},
		{-1, 1},
		{0, 2},
		{-5, -3},
		{999999997, 999999999},
	}
	for _, test := range tests {
		ass.Equal(Add(test.input), test.expected)
	}
}
mock功能
- 使用
testify/mock隔离第三方依赖或者复杂调用 testfiy/mock使得伪造对象的输入输出值可以在运行时决定- 参考:https://github.com/euclidr/testingo
单元测试覆盖率应用实例
https://github.com/m3db/m3/pull/3525